Thursday, June 7, 2012

Wednesday Zen 7


"The world is always changing; sometimes we need to look to the past to see what stays the same."


-Snow Flower and the Secret Fan Trailer (as seen in the preview to the Descendents [it was Carter's turn to pick the movie])

Tuesday, June 5, 2012

Wood Stove Restoration 3


I took the reading room woodstove out to the Blacksmith Shed and reassembled it.  It had been in the shop for repairs and paintwork.  It looks awfully nice now that it is back in place and sporting a new paint job.  We still need to install the thimble into the chimney and work out the stove pipe from the stove to the thimble.  I imagine that we will put an in-line damper in this section of stove pipe as well;  this thimble is actually higher up the chimney than the one for the big stove in the run-in area.  The shed is really starting to come together and it will be exciting to get this little project wrapped up.  What follows are pictures of the reassembled stove:

All the refurbished parts back on site.


We got all the legs back on including the one with the repair.


The reading room woodstove is all put together now - ready for stove pipe and a fire!


Monday, June 4, 2012

Wood Stove Restoration 2

I just realized after reading my “Wood Stove Restoration 1” piece that I may have overused exclamation points in my description.  I apologize for the outpouring of enthusiasm but the fact is that wood stoves excite me.  The idea of standing next to a warm, crackling fire inside while it’s cold/windy/rainy outside seems topnotch; especially after returning from an evening hunt. 
The wood stove that I am currently restoring is going to go into the reading room as I stated in the prior post.  It will be interesting to see how both stoves add to the spaces in which they are being used; they are vastly different in many ways.  It’s the hope that the big double-banger barrel stove that is located in the run-in area will do the bulk of the heating for the run-in area as well as for the bunk room.  The bunk room floor vents will hopefully assist in facilitating this process. 
The reading room is a one story add-on to the original Blacksmith Shed structure that now contains the only access to the bunk room.  This access is a small set of stairs.  I doubt that the reading room woodstove will heat the bunk room.  It should, however, provide a comfortable ambiance if one decides to retreat from the late night fatuities of the run-in area but wants to chill out for a bit prior to hitting the sack.  Perhaps this room will become a place to enjoy a tall glass of bourbon and a few passages from a good book.  It’s also been suggested that this room would be a good location to keep a hunting journal/guest log.  However it works out, we are hoping that both stoves will share the commonality of being functional once I get this one reinstalled.  Here are some pics of the paintwork on the reading room woodstove: 

I took the stove down to as many parts and pieces as I could without going crazy.  The first few pieces closest to the camera lens have the final coat of paint while the ones farther back just have the rust converter applied.


This is the main body of the reading room woodstove.  I have applied the rust converter and am allowing it to dry in the sunlight.


This picture is of the painted body of the woodstove.  The piece to the left of the stove is the thimble which will replace the existing one which is broken.  This is the piece that receives the stove pipe on one side and is mortared into the chimney on the other.

Sunday, June 3, 2012

Wood Stove Restoration 1

I just got started on restoring the woodstove that goes in the reading room of the Blacksmith Shed.  This woodstove belongs to Gordo and was used by him when he was used to guide hunts at a nearby hunting peserve.  The stove will work great as a space heater for the reading room and there is already a stone hearth in place to set it on.  As a bonus, this stove has two cook hatches!  This stove actually may end up being a better cookstove than the beast that we have in the run-in portion of the Shed. 

One of the legs was broke on the stove but fortunately we were able to find both pieces on site.  I got a friend to make the repair so after a little elbow grease and paint the woodstove should be good as new!  Here are a few pics of the start of the restoration process:

Here's the woodstove stripped down from most of its parts and pieces.  It apparenly served as a home to a family of mice during years of nonuse at the blacksmith shed.

I'm hitting the parts and pieces with a wire brush and sand paper to prep for rust conversion and paint.  I'll wipe everything down with acetone prior to applying the rust converter.

 
Here you can see the stove leg that had to be repaired.

This piece is labeled "HOT when in use."  Good information.

Sunday, May 20, 2012

Bunk Room Complete!


The workdays at the shed have been less frequent of late with the spring social season being in full swing.  Weddings, bachelor parties, and mini-vacations have all occupied the better part of most weekends.  That being said, we have been making the most of our time at the shed when we can manage to get out there. 


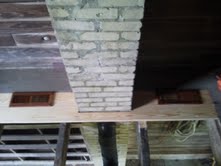
Recently, we tucked into the floor repairs in the bunk room.  The area around the chimney was the spot that needed the most attention.  If you recall from the insulation video, Will and I worked on replacing rotted ceiling boards that were adjacent to the chimney prior to insulating the attic space.  The area where a chimney penetrates a roof is often one of the first spots to have problems.  The Blacksmith Shed roof doesn't have a chimney cricket in place.  Over the years, snow and debris would accumulate on the backside of the chimney and this cycle eventually led to the failure of the roof flashing at this location.  As our initial focus was to tighten up the building envelope, this roof repair was one of the first things completed and there are photos of Jay working on this in earlier blog posts.


The floor repairs in the bunk room represent a benchmark of sorts for the project.  This room is now 100% done with the exception of the installation of bunk beds or lofts for sleeping.  The room has a dutch door with a shooting window, two operable windows, an insulated attic space above, and all woodworking repairs complete.  A detail that you may notice in the following pictures is the installation of heart pine and cherry floor vents.  These vents are located directly above the massive woodstove in the run-in area below.  We are hoping that with the attic being insulated and the woodstove rolling below that the bunk room will stay toasty enough during hunting season.  Time will tell on this theory though.


Pictures of the floor repairs:
Its hard to see but all the boards around the chimney were really punky as a result of the old roof leak.

Small sidenote here - we had actually fired up the woodstove that morning because it had been a bit chilly out.  This proved to be a huge mistake.  It made this repair absolutely miserable as it got so hot.  Perhaps a good sign for vent theory though.

Again, you can see part of the woodstove as I was roasting while cutting a scarf joint in the top of the damaged floor joist for a small dutchman repair that would keep the floor boards running flat upstairs. 

Two vents installed.  These actually have a louvered insert so we could shut them down if we ever wanted to.  These two vents are going to end up being under bunk beds so they will probably just stay wide open most of the time.

Floor patch complete - we elected not to tooth the new floor boards back into the existing ones as you can see. Afterall, it is just a hunting cabin. 

We had some scraps laying around so we decided to trim the base and top of the chimney with a little threshold-like detail.  Byrd insisted on the bevel cut for aesthetic purposes.

We had one other spot that was bad - close to where one of the windows had been missing for years.  This is me getting the floor prepared to drop in a a few new floor boards.


Wednesday, May 2, 2012

Wednesday Zen 6


Do not go where the path may lead, go instead where there is no path and leave a trail.
-Ralph Waldo Emerson


Workday Recap


The last workday at the shed was a super productive one.  Low temps and spitting rain did little to slow down a solid crew of Will, Adam, Byrd and I.  Adam brought out his trailer and insulating equipment to the worksite.  We fired up the gas powered super vac and sucked up two contractor's bags worth of dirt, dust, and miscellaneous debris.  While he and Byrd focused on the insulation prep, Will and I fixed ceiling boards that needed some love in the bunk room and the reading room.  We closed the day out with about 12 bags of blown cellulose insulation and some chill time by the wood stove.  Great day despite the crappy weather; see the prior video post which does a good job of capturing the magic visually.


In addition to the tasks just described above (which can all now be checked off the list), Will got fired up and installed one of the reading room windows.  This was particularly timely given the inclement weather.  Big ups to William for his initiative.  We now have one window left to do which is on site ready to go if anybody was to get froggy again. 


Some pics of the William installing the window and me putting the trim back on:
Top Sash is in but hard to see...

Both Sash installed and working smoothly.

Stop nailed back on and we are ready to go.